AWS Beanstalk
This tutorial shows how to deploy an application with an SQL database to AWS Beanstalk. It assumes that you already have an AWS account and have access to your console.
Prerequisites
Do not use SQLite
SQLite databases are not supported by AWS Beanstalk. You have to use a different one such as Postgres, MySQL, MariaDB, Oracle or MSSQL.
Make sure that the SQLite driver is also uninstalled.
npm uninstall sqlite3 connect-sqlite3
Configure the Database Credentials
Replace your ormconfig.js (or ormconfig.yml or ormconfig.json) file with this one:
ormconfig.js
const { Config } = require('@foal/core');

module.exports = {
  type: Config.get('database.type'),
  url: Config.get('database.url'),
  database: process.env.RDS_DB_NAME || Config.get('database.name'),
  port: process.env.RDS_PORT || Config.get('database.port'),
  host: process.env.RDS_HOSTNAME || Config.get('database.host'),
  username: process.env.RDS_USERNAME || Config.get('database.username'),
  password: process.env.RDS_PASSWORD || Config.get('database.password'),
  entities: ["build/app/**/*.entity.js"],
  migrations: ["build/migrations/*.js"],
  cli: {
    "migrationsDir": "src/migrations"
  },
  synchronize: Config.get('database.synchronize')
};
And complete your configuration file config/default.json (or config/default.yml) with your local database credentials:
The below credentials are an example. If you want to use them, you need to install PostgreSQL on your local host, create a database named
my-dband install the postgres driver in your project (npm install pg). But you are free to use another database with other credentials if you want to.
{
  "settings": {
    // ...
  },
  "database": {
    "type": "postgres",
    "name": "my-db",
    "port": 5432,
    "username": "postgres",
    "synchronize": true
  }
}
Sessions
Case 1: The application does not use sessions
If you do not use sessions, then remove the store import and the store option from the createApp function in the src/index.ts file.
import 'source-map-support/register';

// std
import * as http from 'http';

// 3p
import { Config, createApp } from '@foal/core';
// The store import is removed.
import { createConnection } from 'typeorm';

// App
import { AppController } from './app/app.controller';

async function main() {
  await createConnection();

  // The store option is removed.
  const app = createApp(AppController);

  const httpServer = http.createServer(app);
  const port = Config.get('port', 3001);
  httpServer.listen(port, () => {
    console.log(`Listening on port ${port}...`);
  });
}

main();
Case 2: The application uses sessions
If your application uses sessions, you need to provide a session store.
Here is an example with connect-redis:
import 'source-map-support/register';

// std
import * as http from 'http';

// 3p
import { Config, createApp } from '@foal/core';
import * as redisStoreFactory from 'connect-redis';
import { createConnection } from 'typeorm';

// App
import { AppController } from './app/app.controller';

async function main() {
  await createConnection();

  const app = createApp(AppController, {
    store: session => new (redisStoreFactory(session))(/* options */)
  });

  const httpServer = http.createServer(app);
  const port = Config.get('port', 3001);
  httpServer.listen(port, () => {
    console.log(`Listening on port ${port}...`);
  });
}

main();
This guide does not explain how to set up a redis database on AWS Beanstalk.
Create the AWS Application and Add a Database
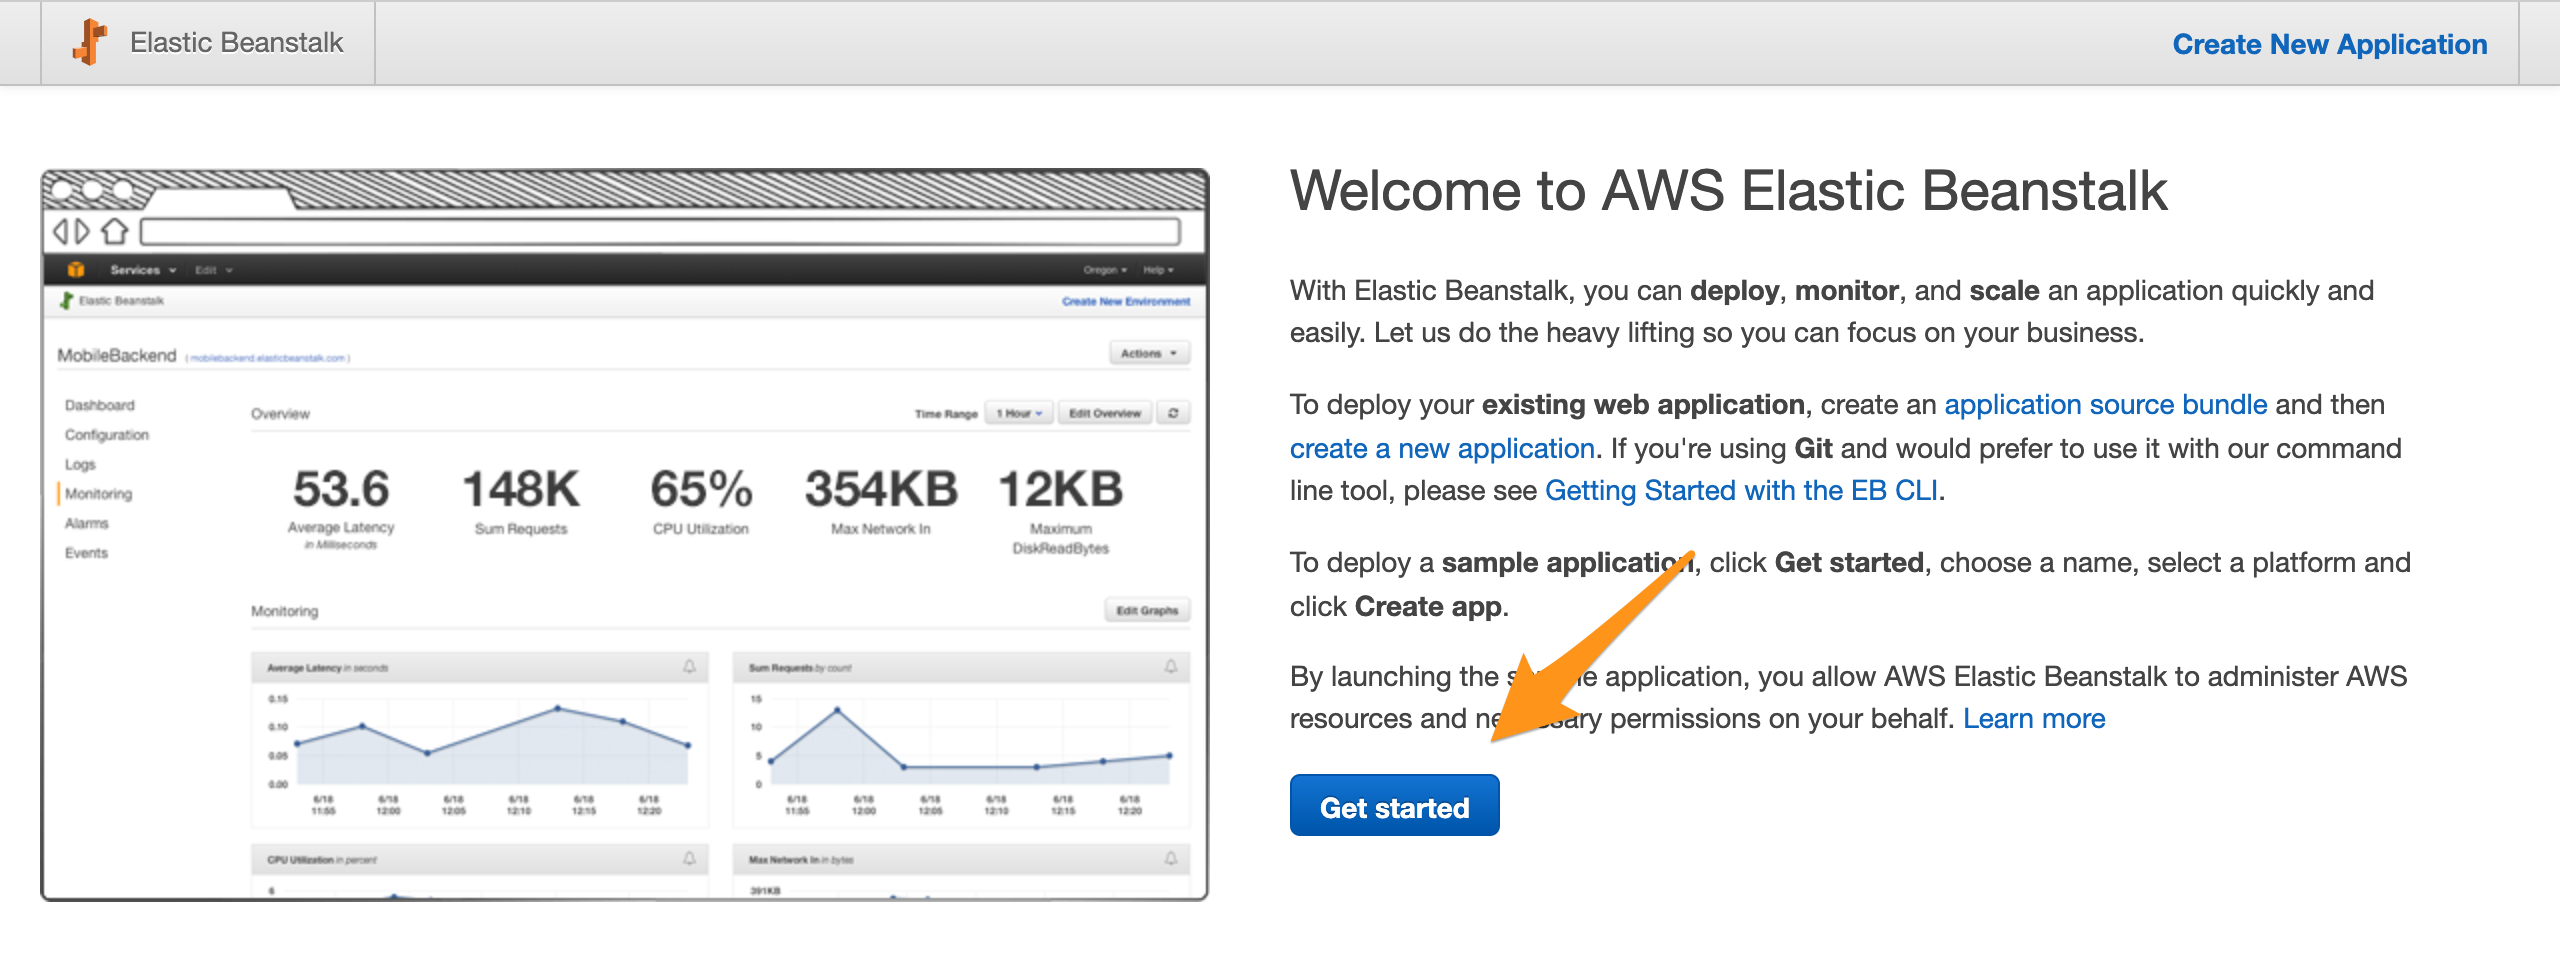
Go to https://console.aws.amazon.com/elasticbeanstalk/home and click on Get Started.
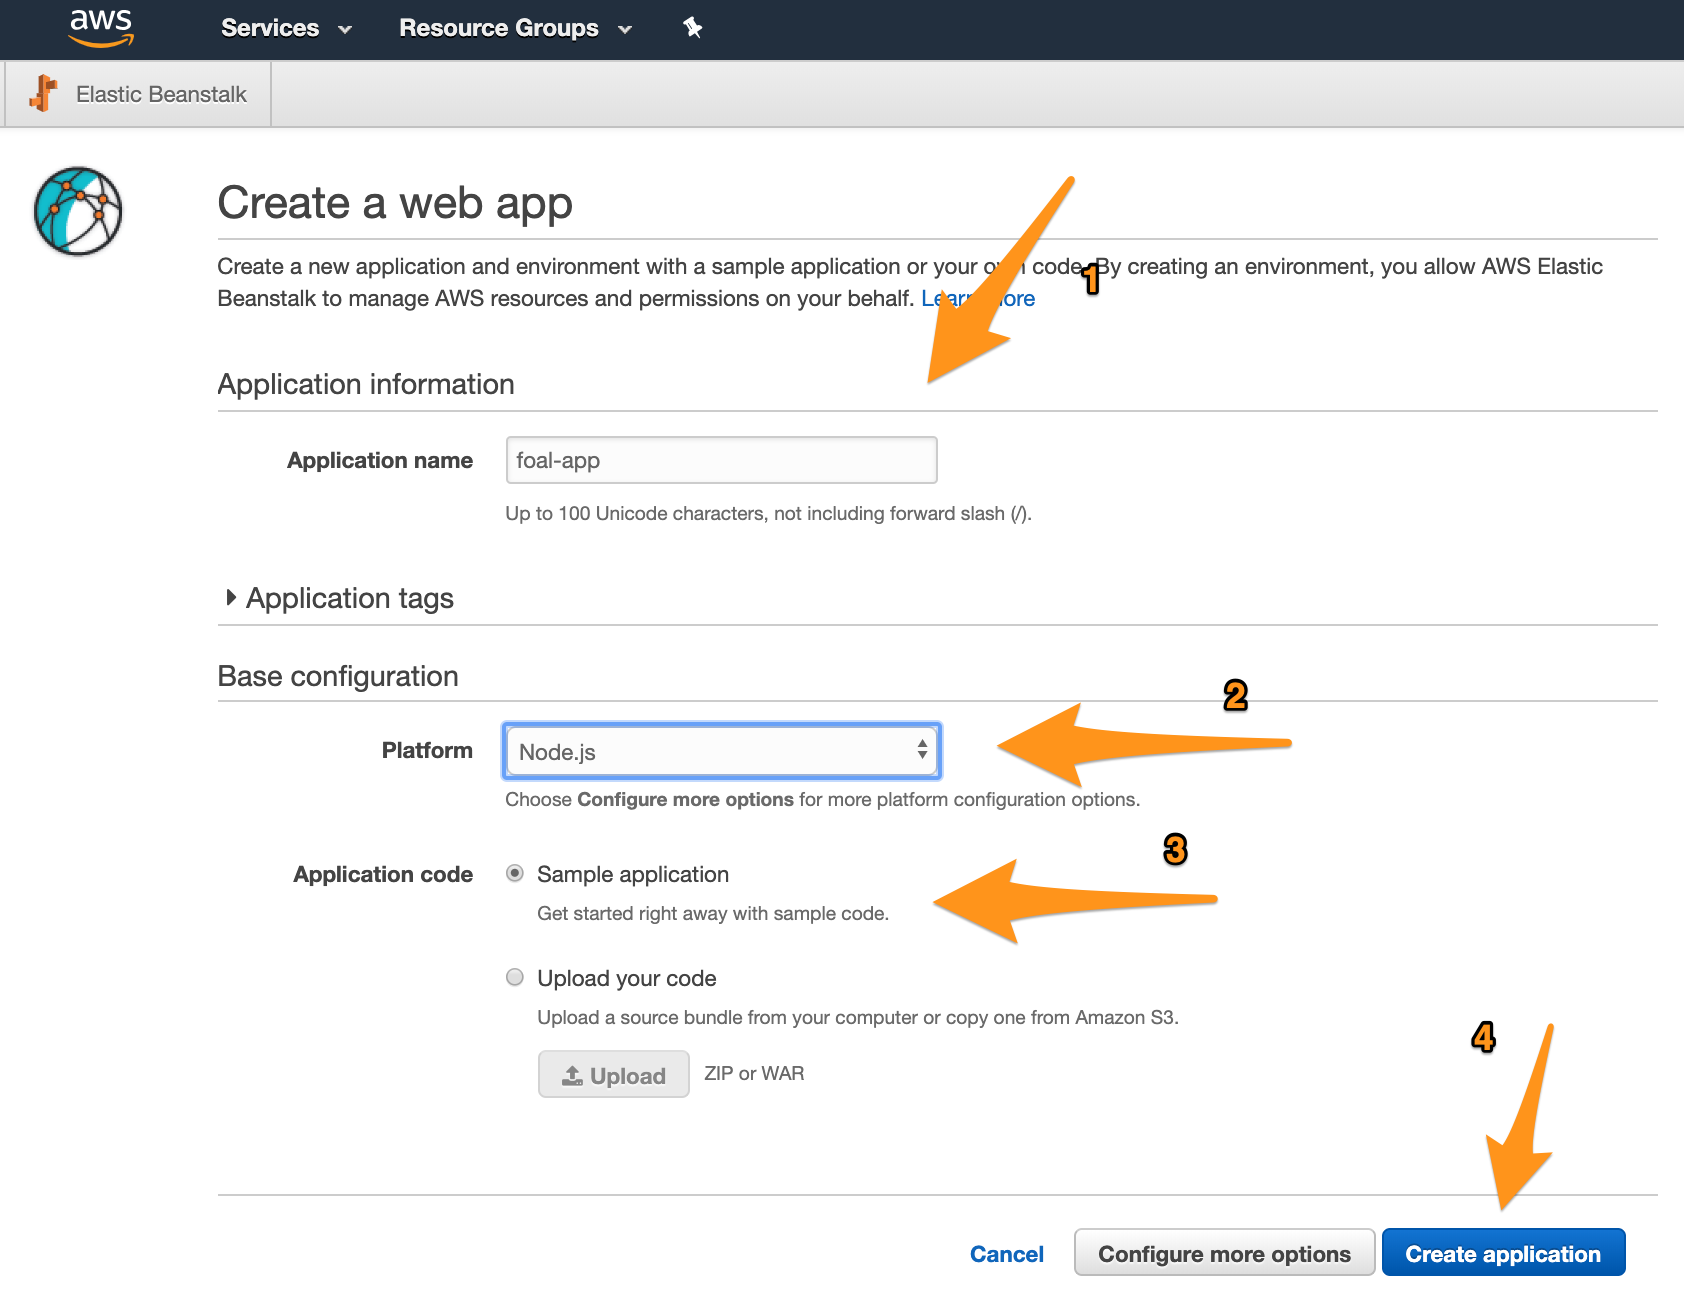
Enter the name of your application, choose the Node.js platform and select the Sample Application.
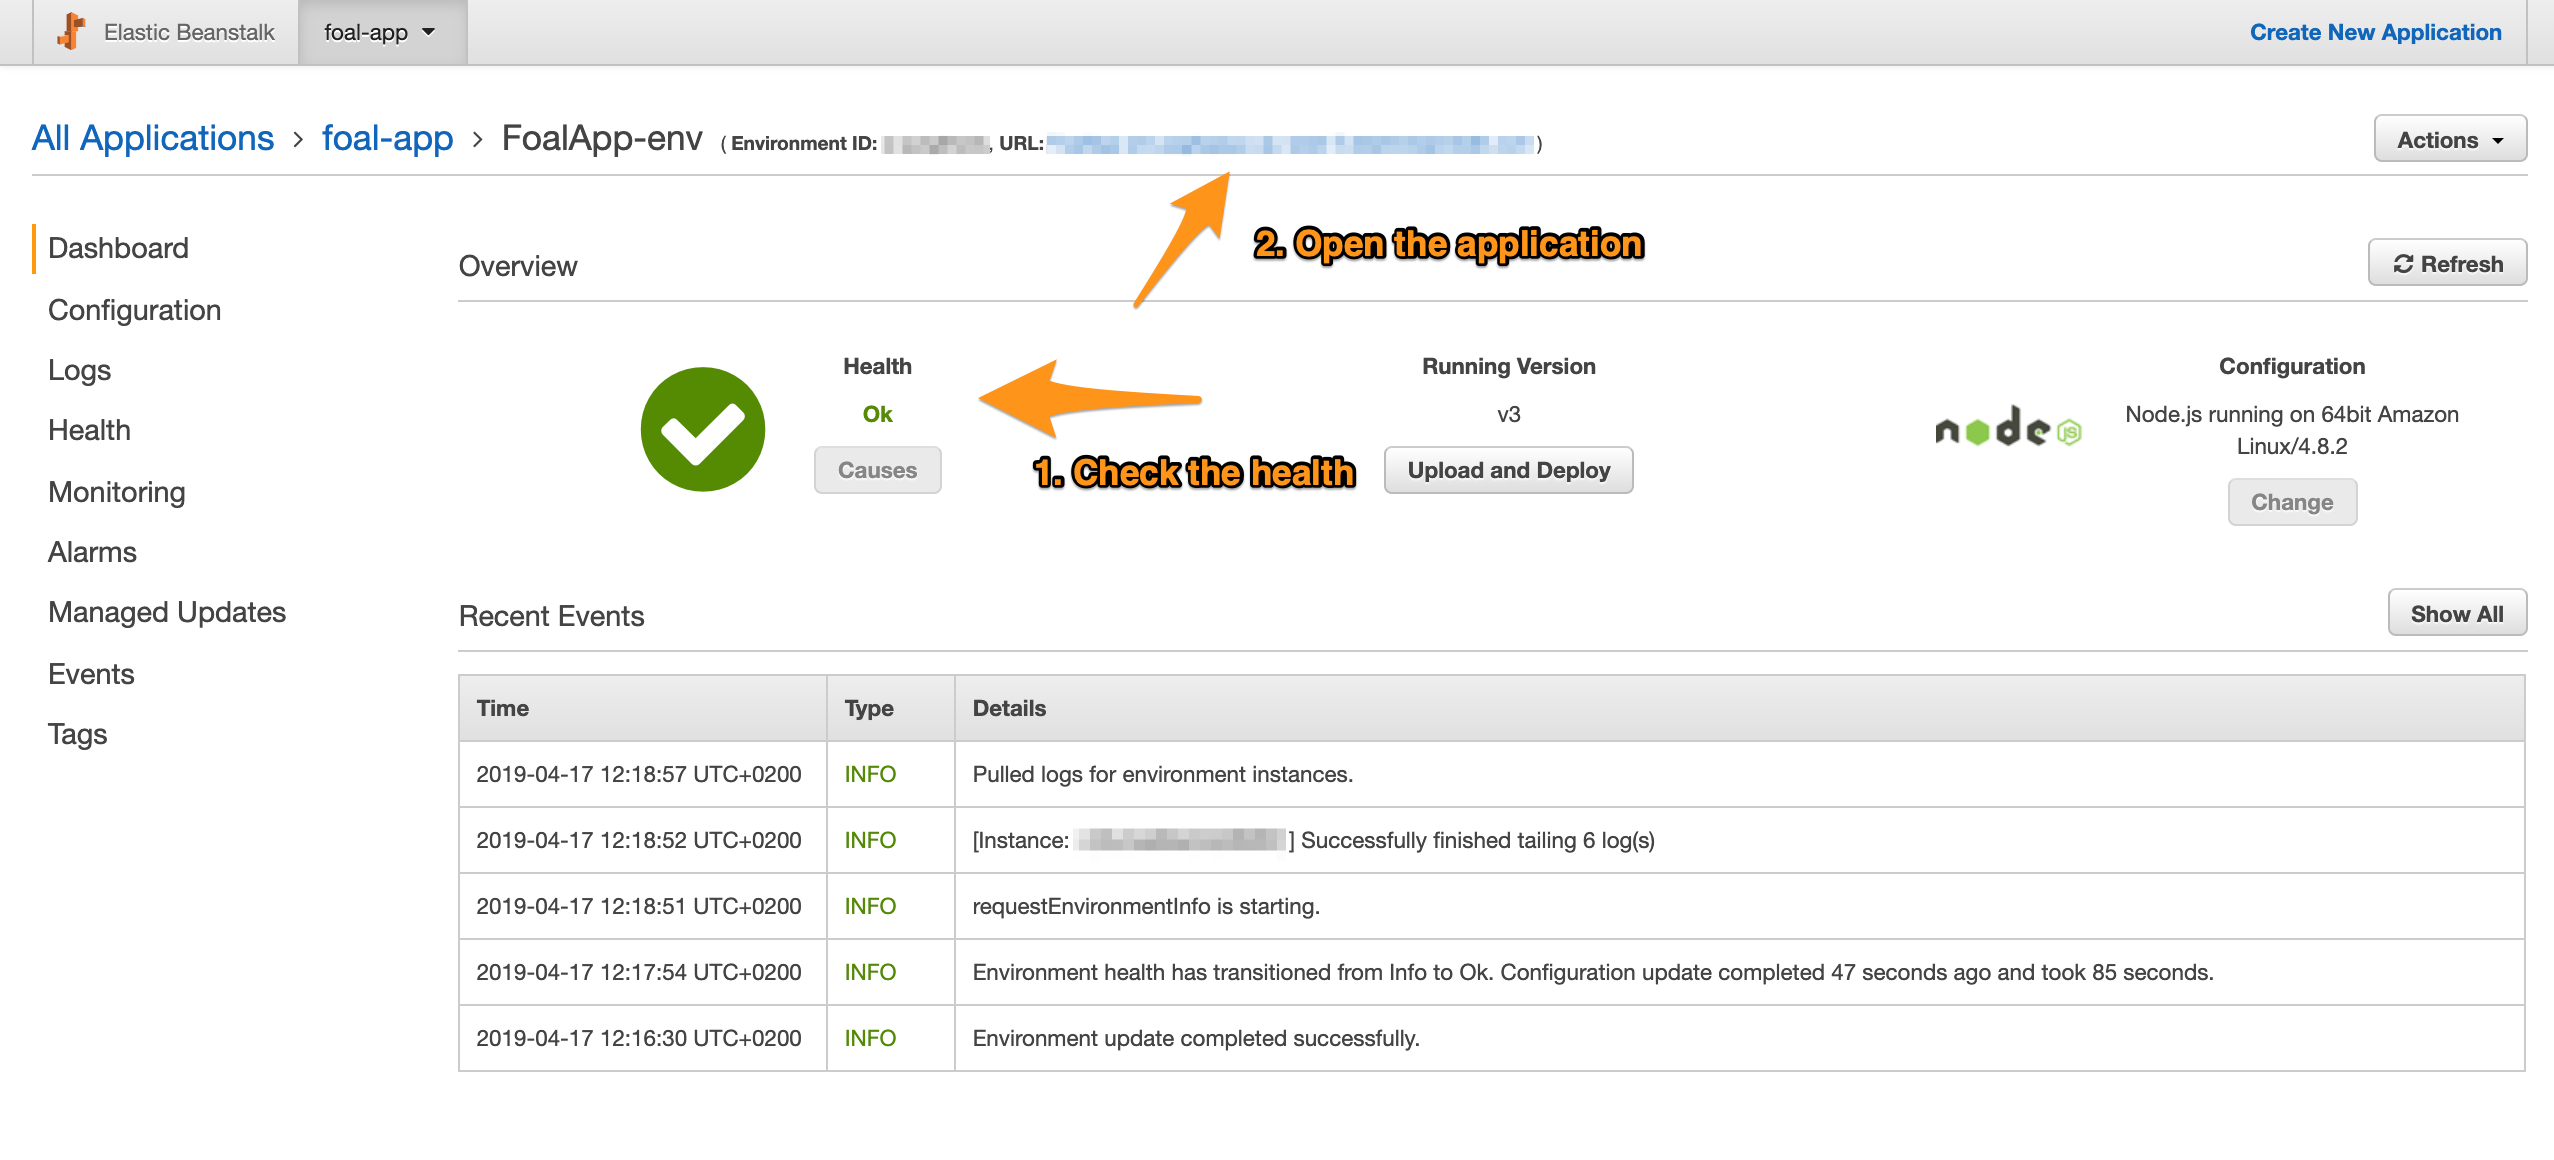
AWS creates and loads the new application. This takes a few minutes. Then check that the application health is ok and open the application.
If the health is incorrect, click on the Causes button to see what happened.
The home page should look like this:

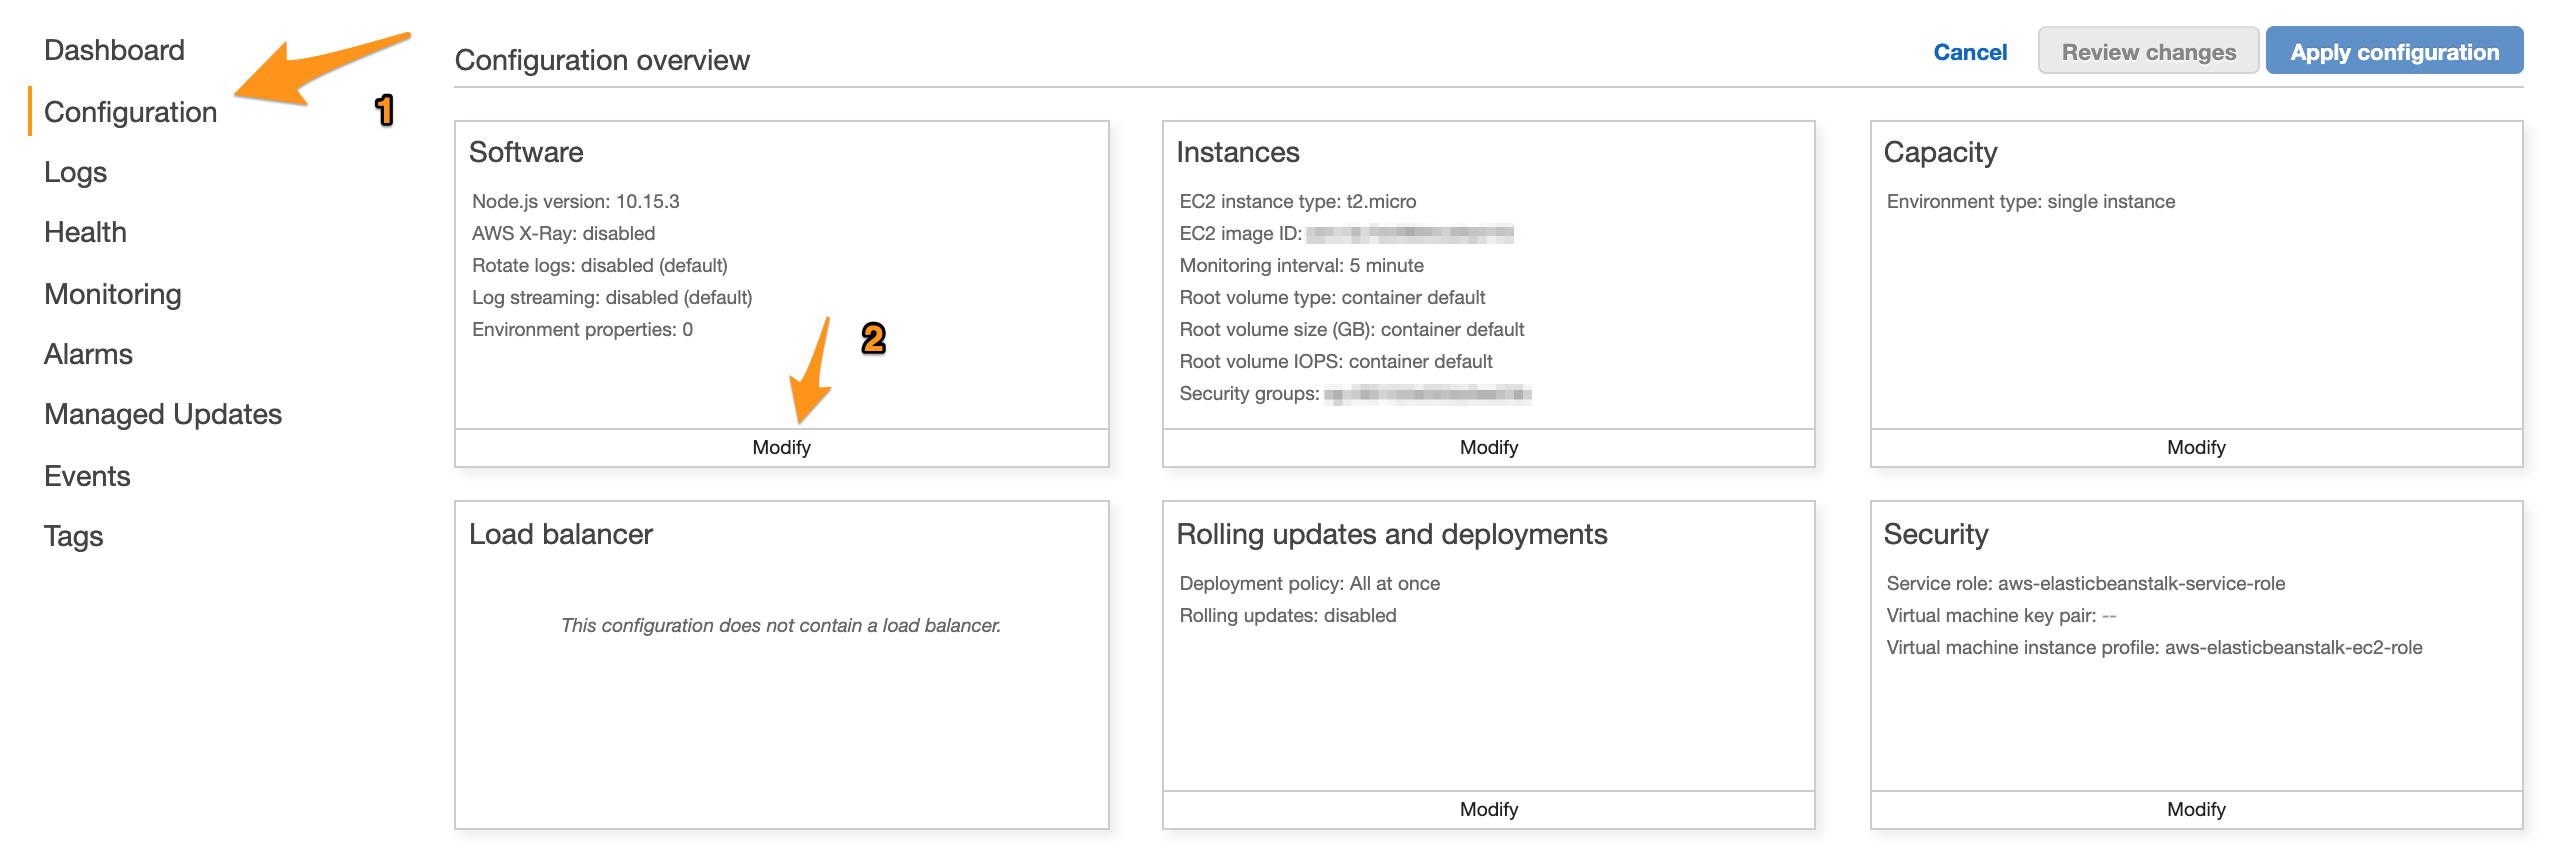
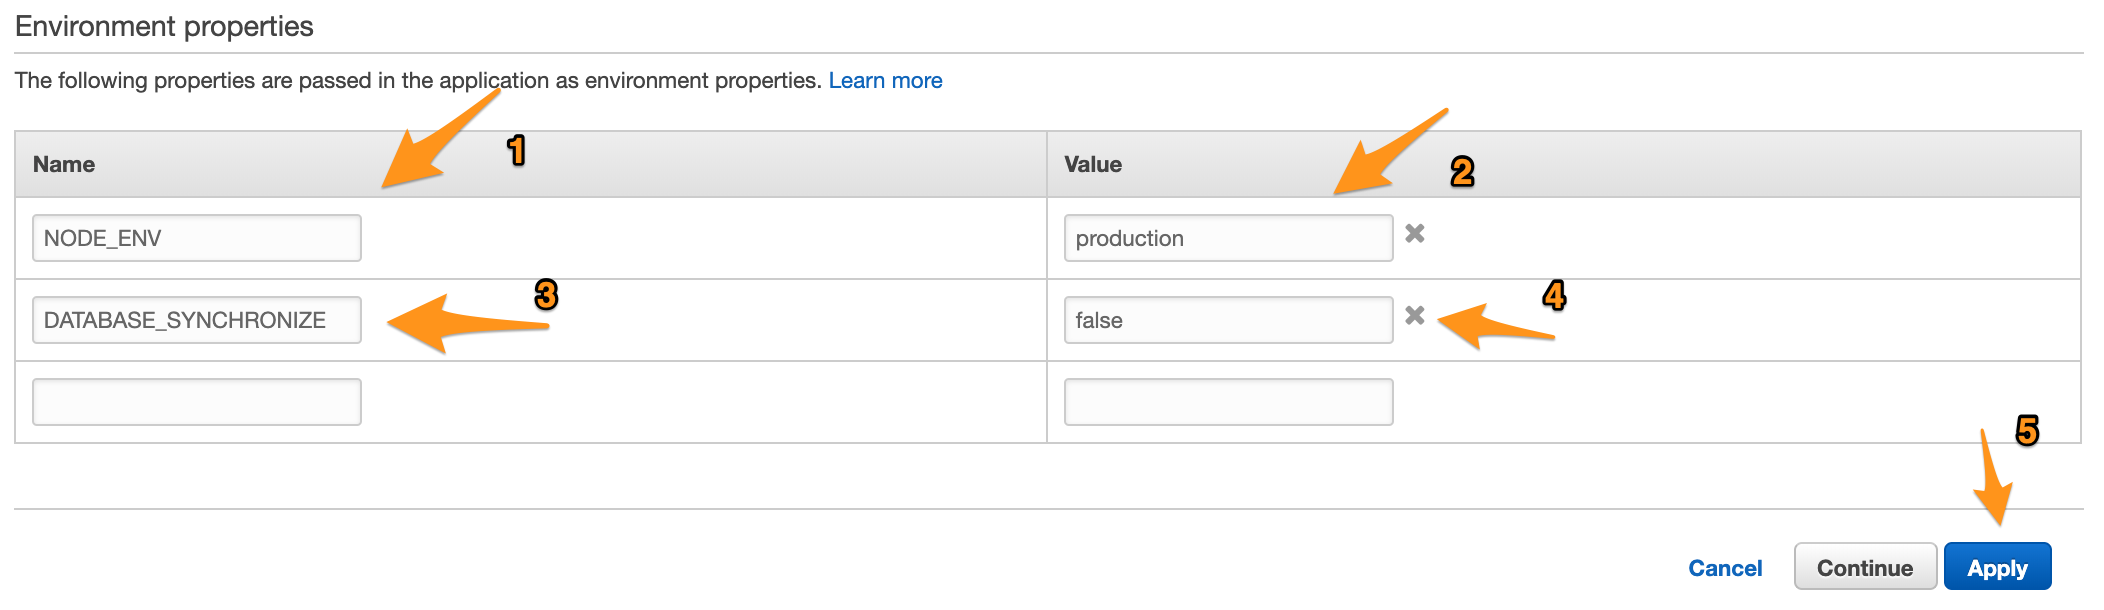
Now it is time to configure your environment and add a database. Click on the Configuration button and set the environment variables NODE_ENV and DATABASE_SYNCHRONIZE.
The
NODE_ENVvariable tells FoalTS to look at the production configuration (for exampleconfig/production.json).The
DATABASE_SYNCHRONIZEvariable tells TypeORM not to update the database schema on every application launch (see section Generate & Run the Database Migrations below).
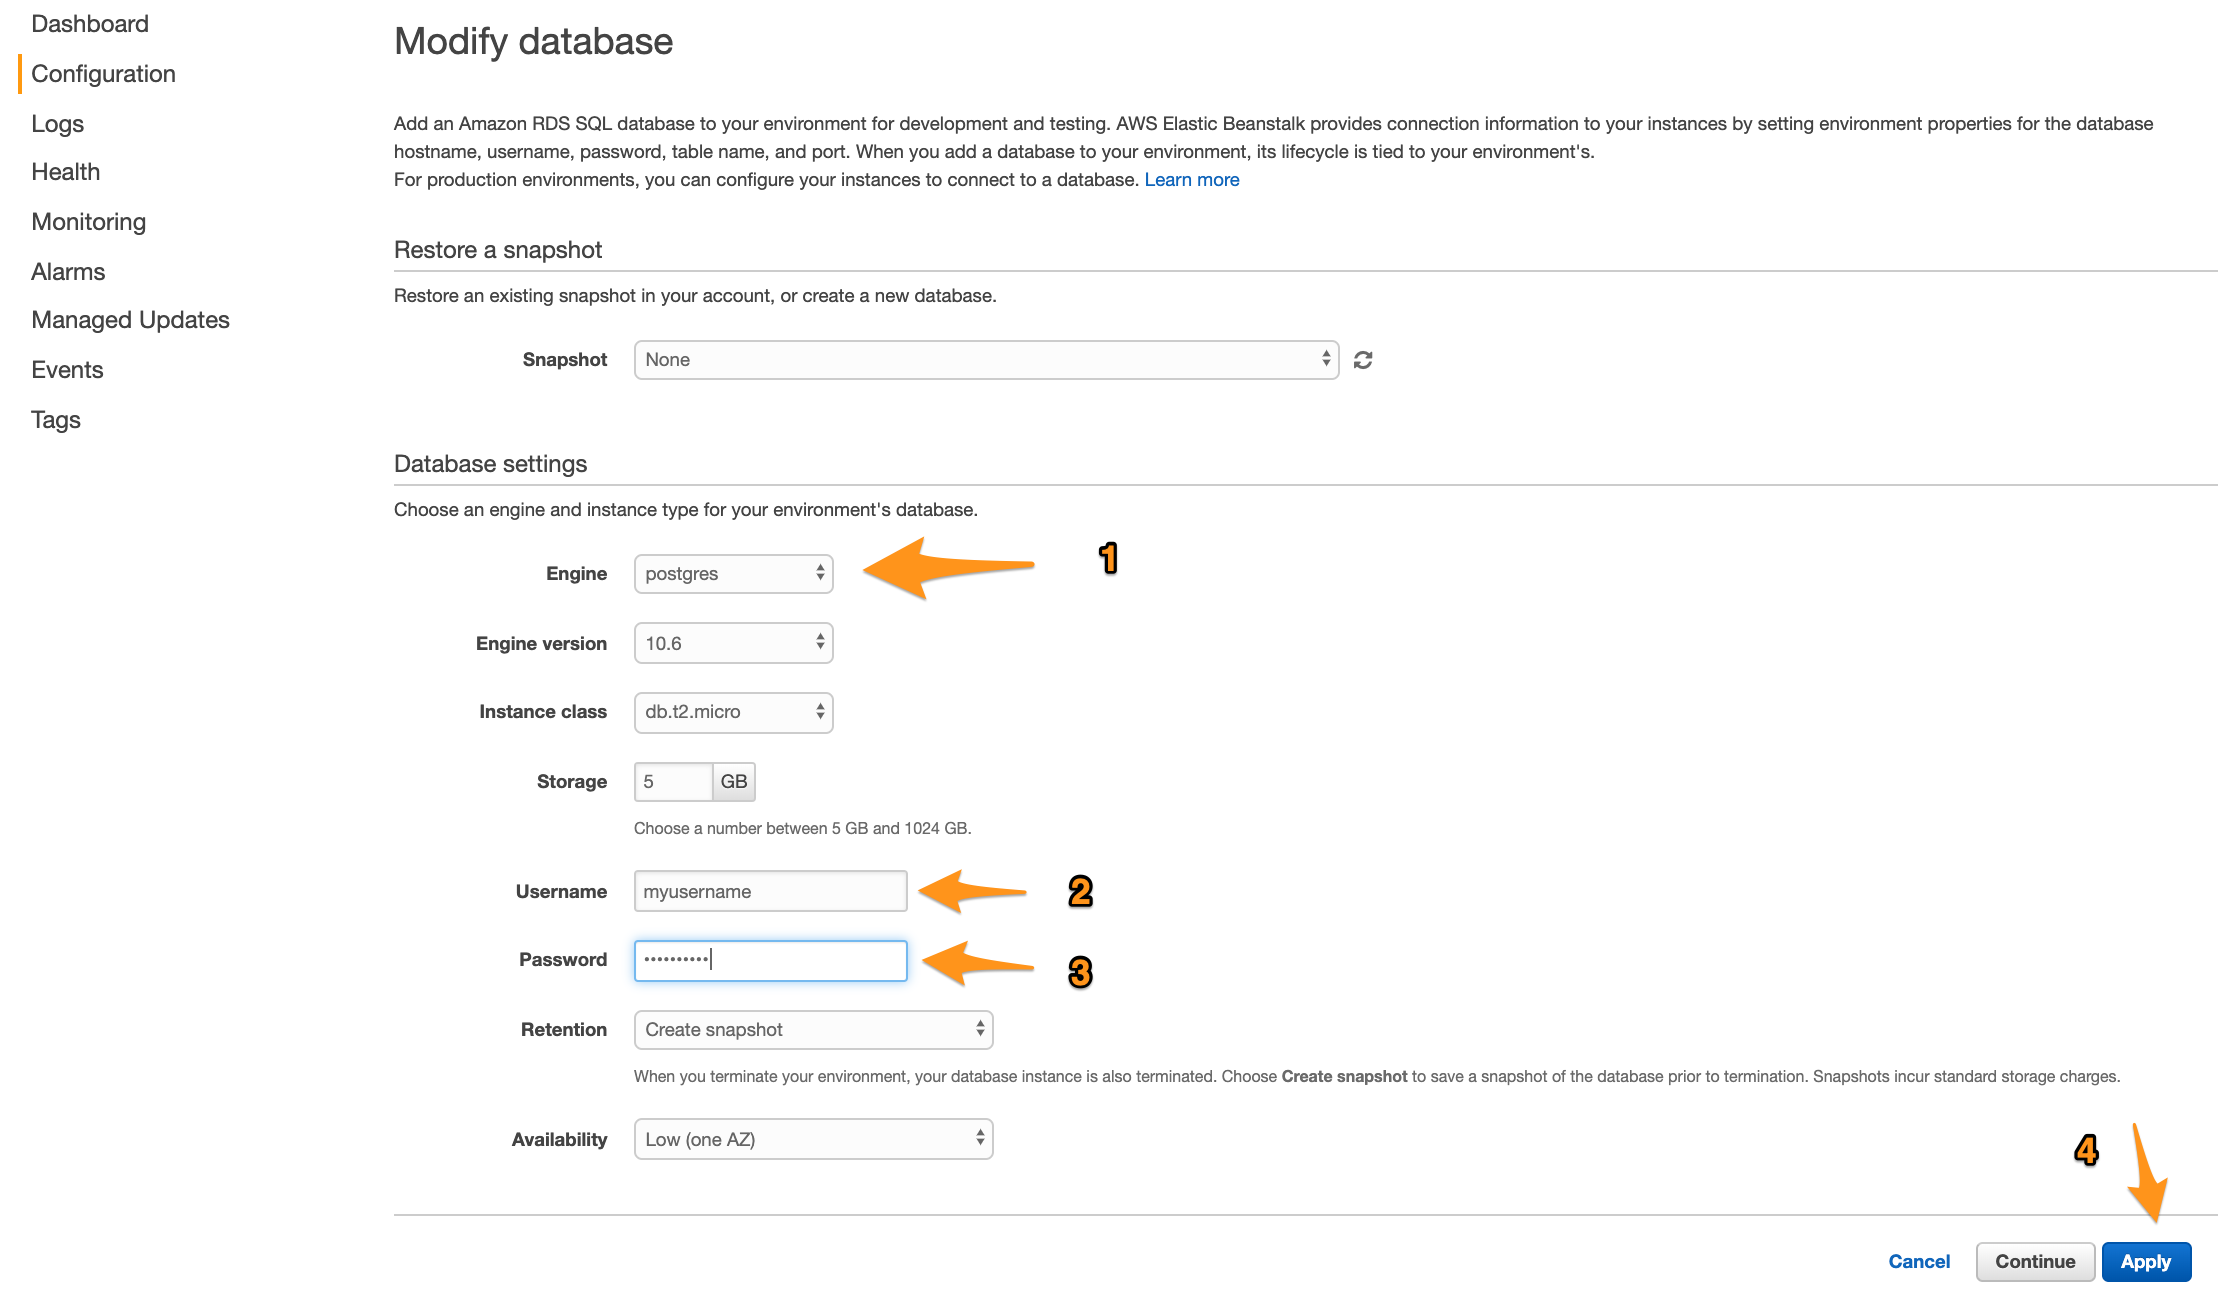
Then create a new database from the configuration page.

Choose the database engine (postgres in this example) and enter the production database credentials.
Deploy the Foal Application
Build the app.
npm run build:app
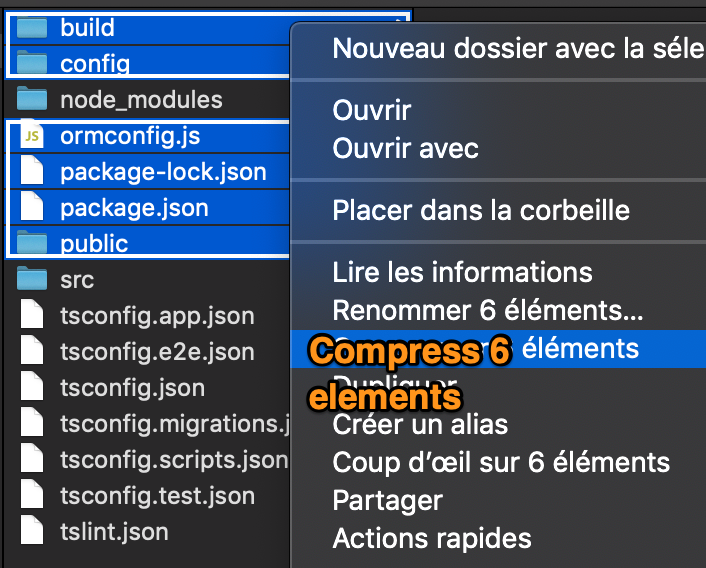
Create an archive from the directories and files build/, config/, public/, ormconfig.json, package-lock.json and package.json.
Upload the archive to AWS.
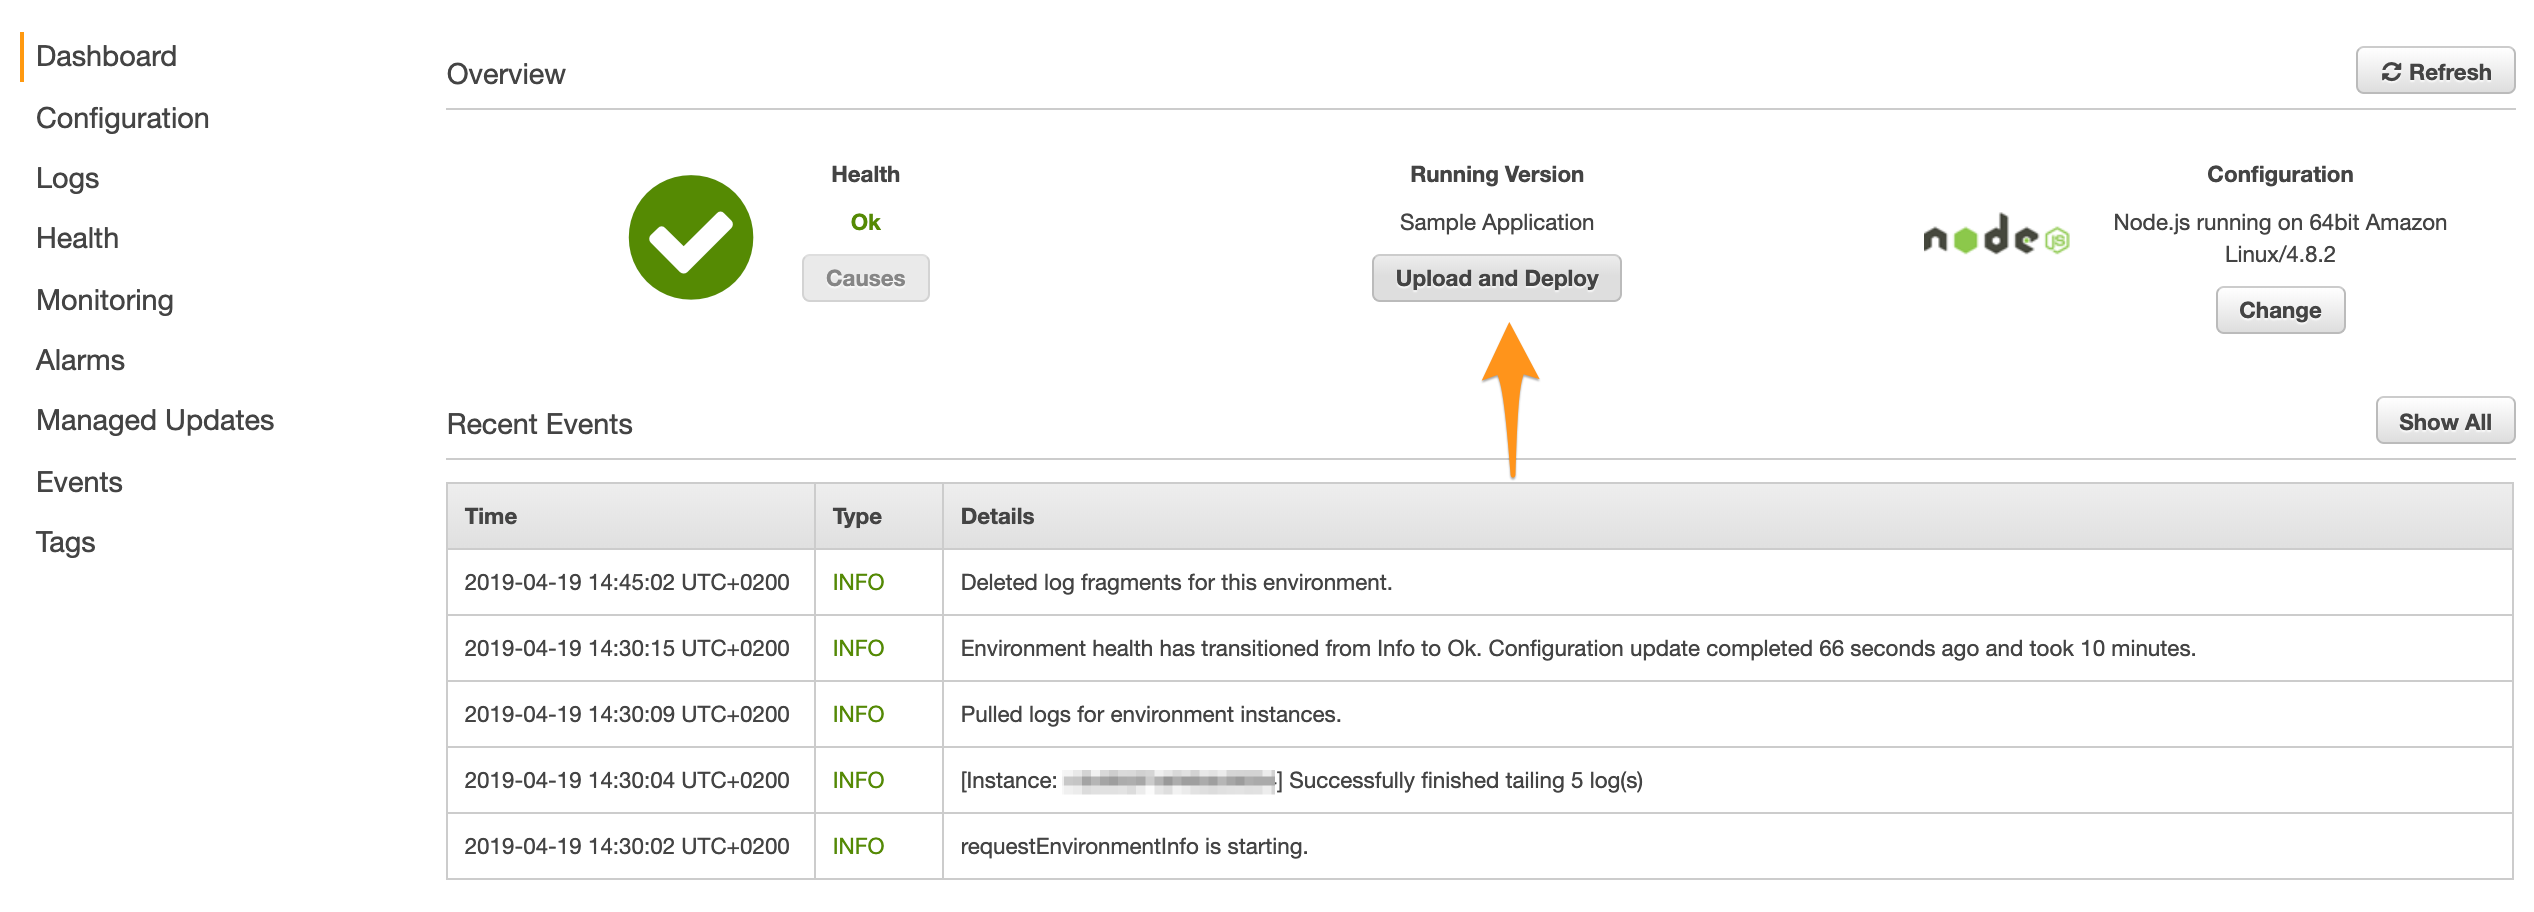
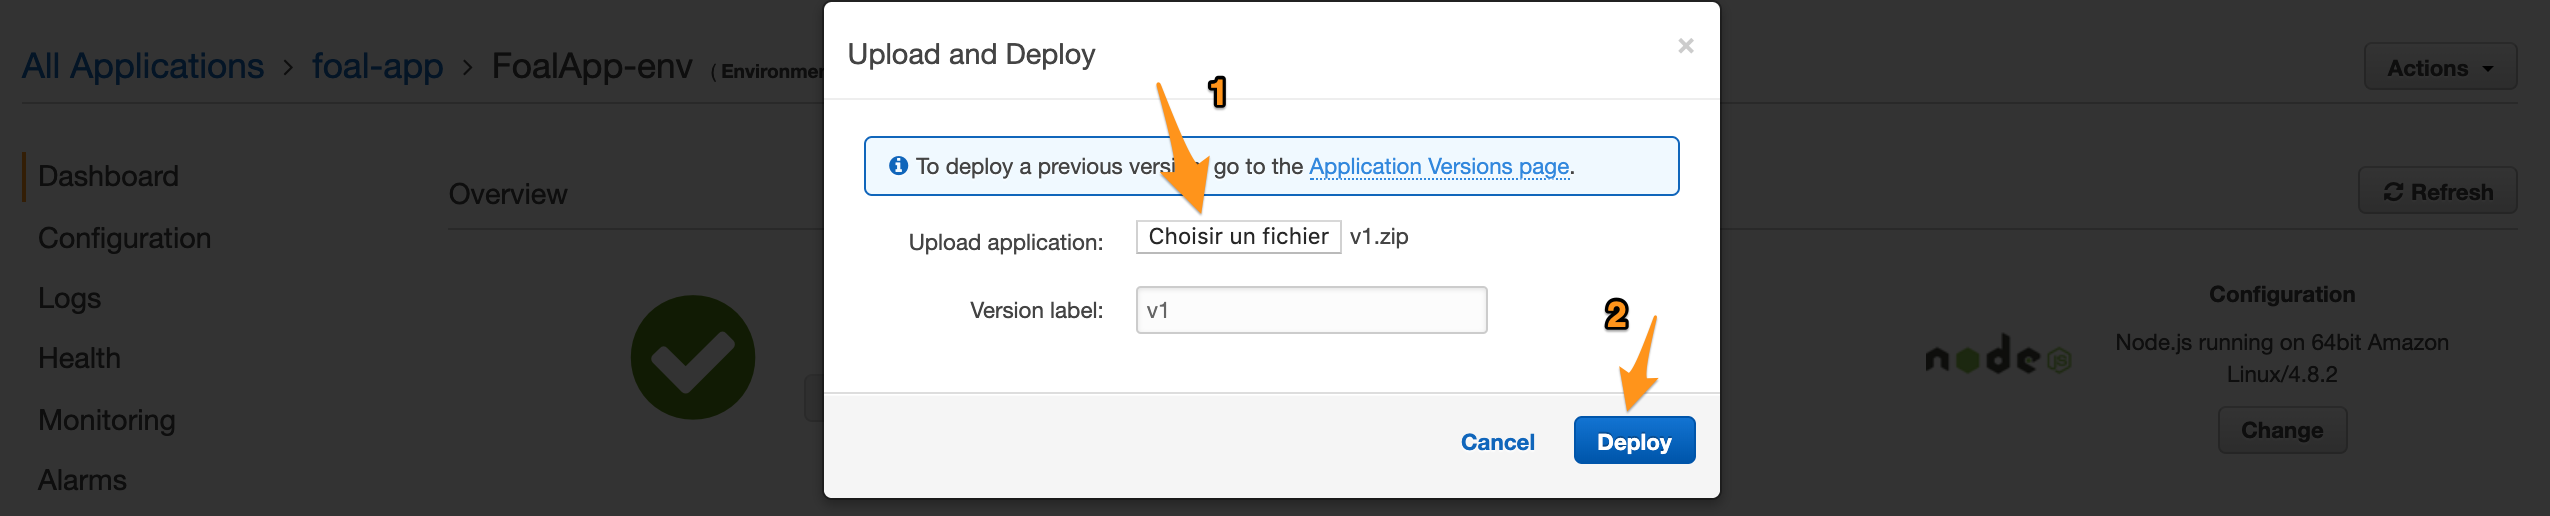
The application restarts. This may take a few minutes.
Generate & Run the Database Migrations
Warning, warning: this section is only compatible with projects created with FoalTS v0.8. If you need a tutorial for v1 and above, feel free to open a Github issue for that.
Migrations are SQL queries that modify the database schemas (definition of the tables, relations, etc). By default, every new Foal project is created with the option synchronize: true in its ormconfig. This setting updates the database schema on every launch of the application.
But using this in production is considered unsafe (data could be lost for example if a model is changed by mistake). That's why we will generate and run migrations manually. To do this, we will need access to the database.
Warning This section assumes that you have previously set the environment variable
DATABASE_SYNCHRONIZEtofalse. This overrides thesynchronizesetting on AWS.
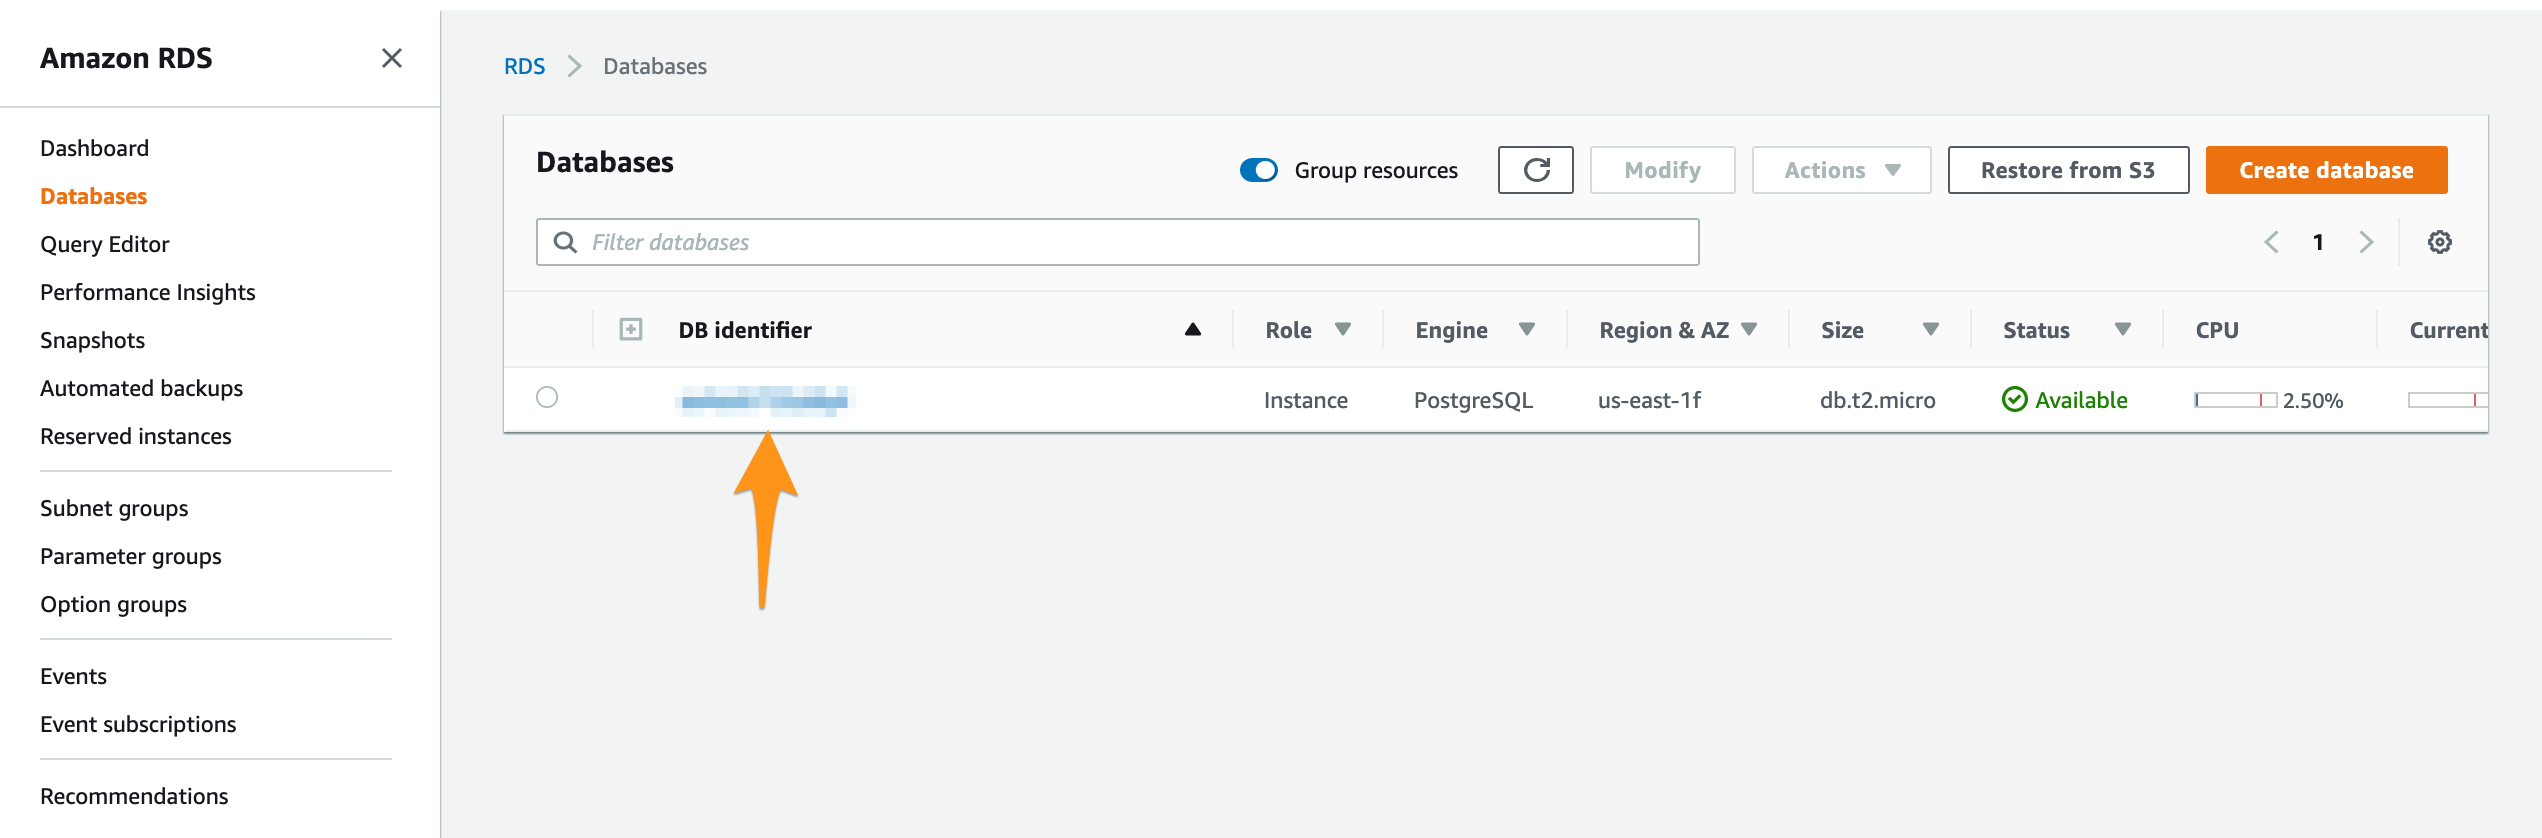
Go to AWS database page and click on your database.
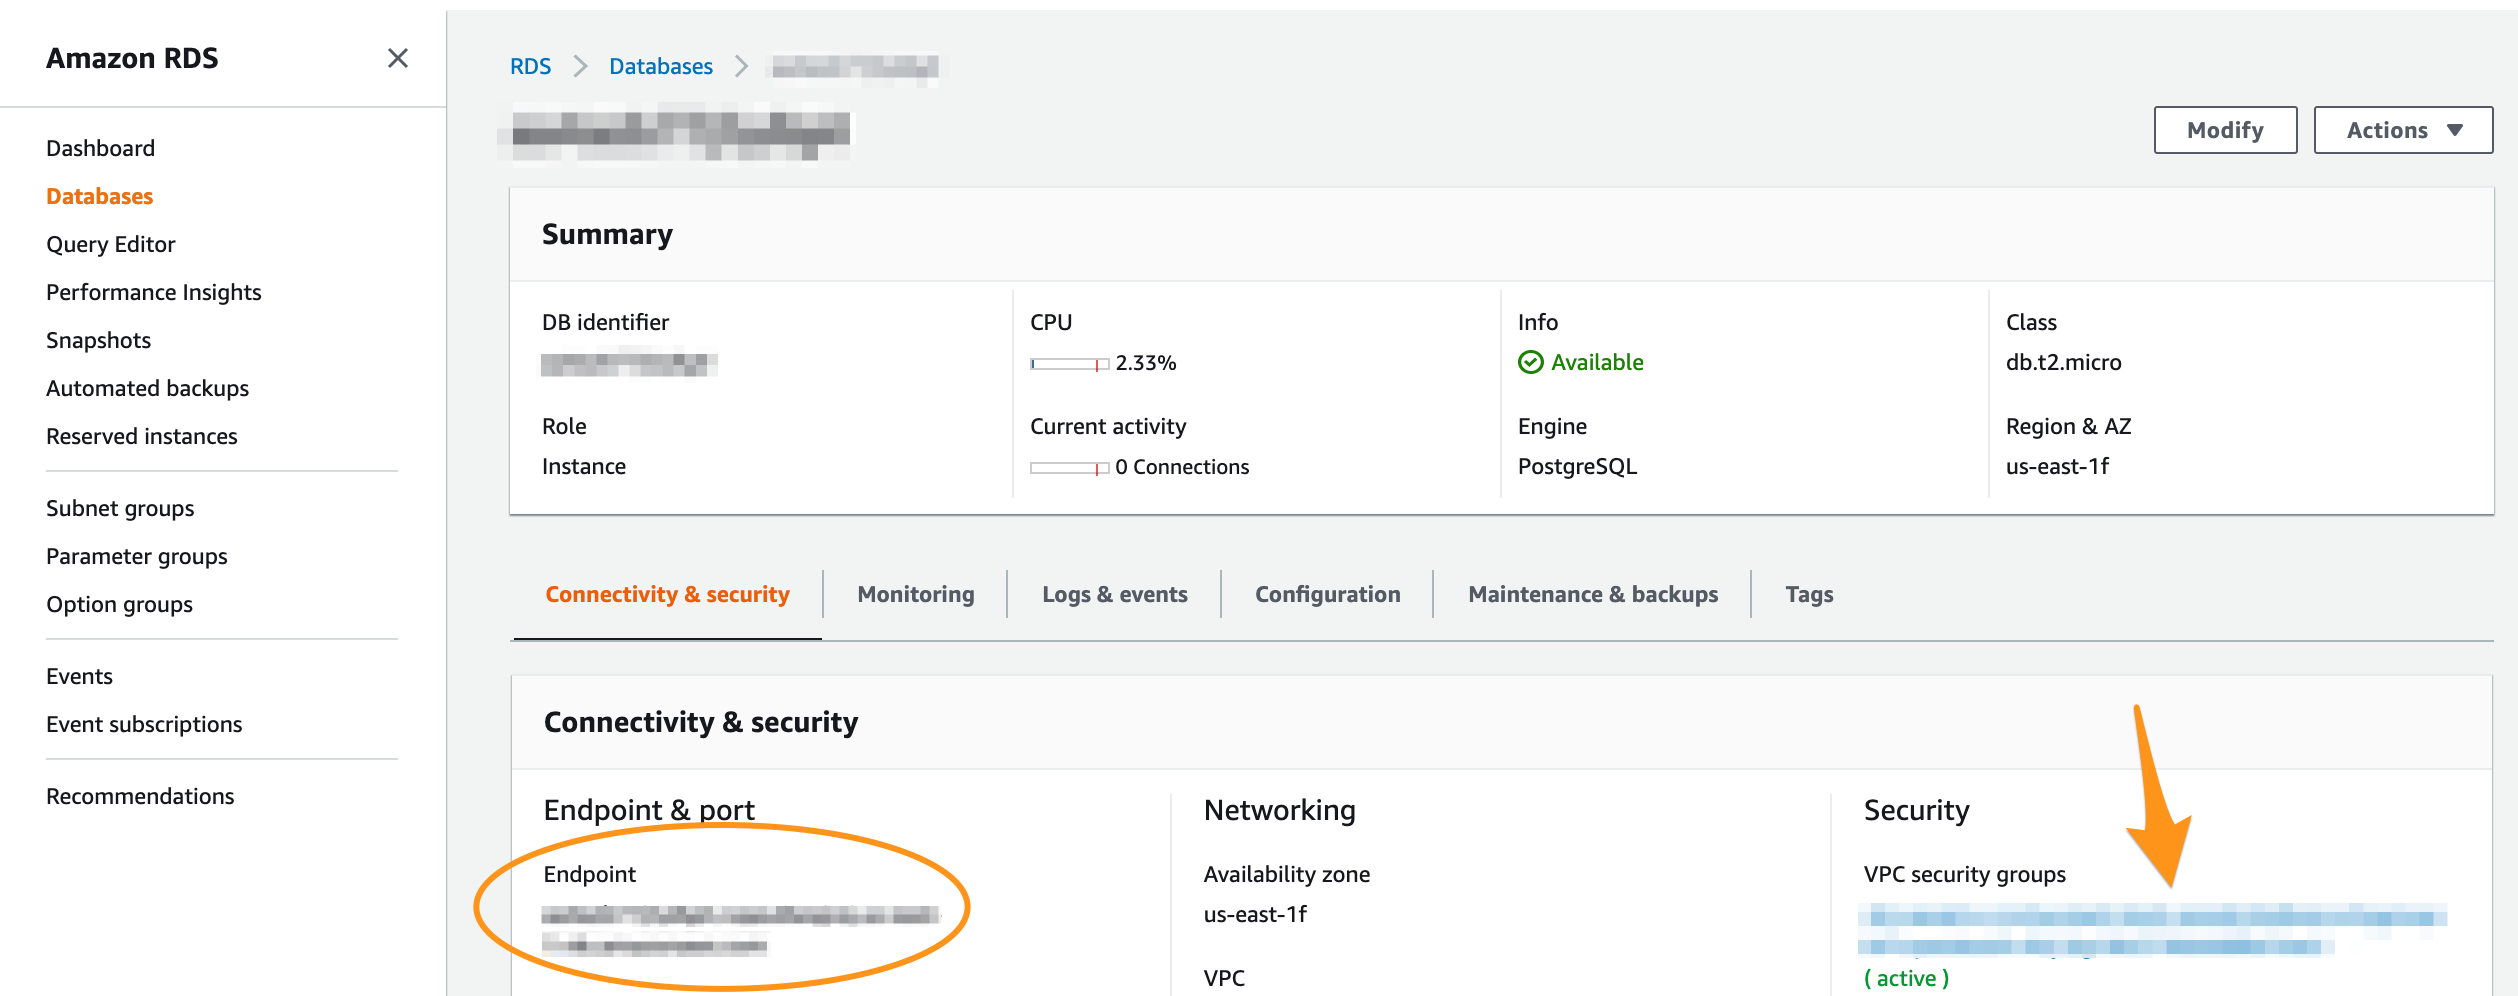
Save the URL endpoint and click on the VPC security group. We will tell AWS that we can access the database from our local host.
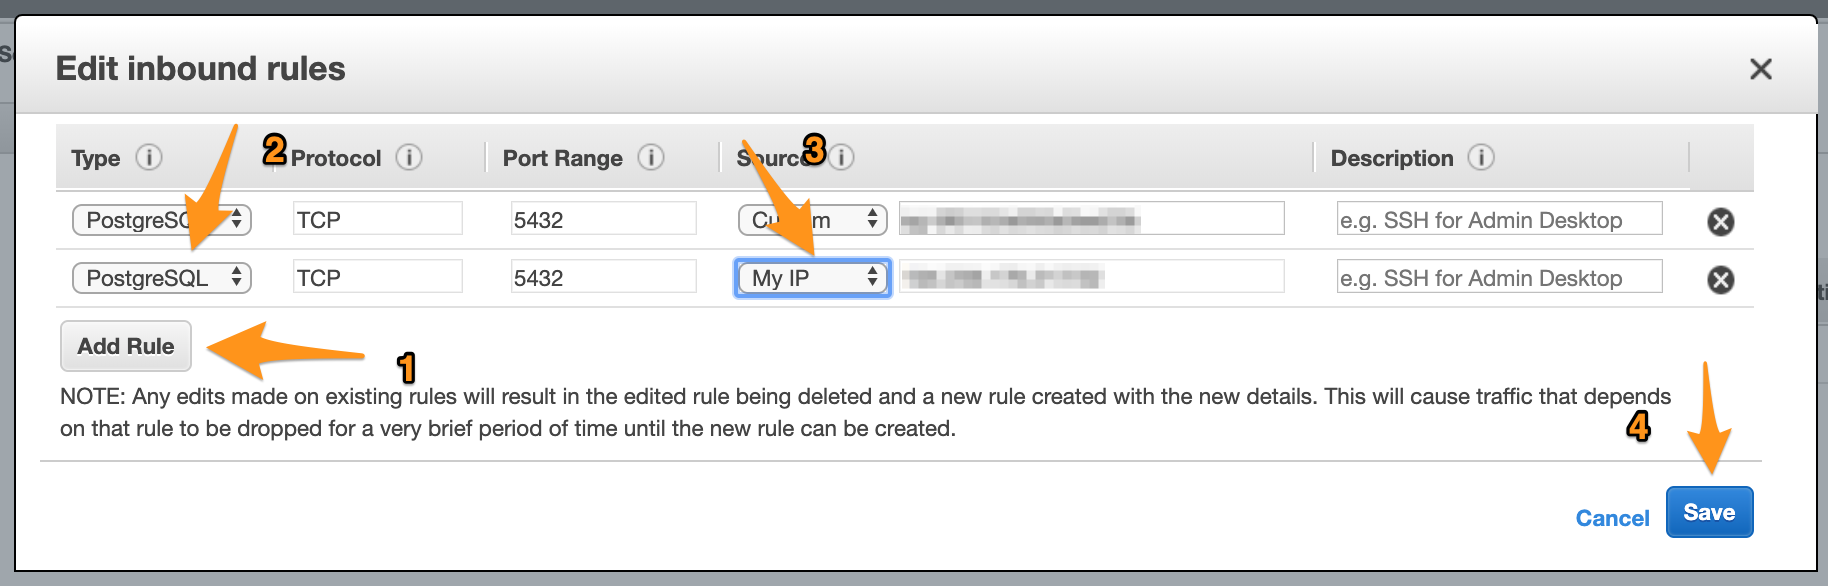
Add a new inbound rule. Make sure you don't delete the one that already exists.

You are now able to communicate from your local host with the production database (as long as you provide the correct credentials).
The next part of the tutorial assumes that you did not change the default option
synchronize: truein theormconfigfile. This is probably the case if you have never had to deal with migrations before.
Open a new terminal/console.
Enter the database credentials.
On Mac and Linux
export DATABASE_HOST=<the previous saved endpoint>
export DATABASE_USERNAME=<the database username> # in the tutorial, it is myusername
export DATABASE_PASSWORD=<the database password>
export DATABASE_NAME=ebdb
On Windows
set DATABASE_HOST=<the previous saved endpoint>
set DATABASE_USERNAME=<the database username> # in the tutorial, it is myusername
set DATABASE_PASSWORD=<the database password>
set DATABASE_NAME=ebdb
Generate the migration.
npm run migration:generate -- --name first-migration
A new migration file appears in src/migrations/. Check that it is correct and then build it.
npm run build:migrations
Then run the migration.
npm run migration:run
The database schema is updated. Your remote application should now run properly.
Close your terminal / console. Do not start your local application in the same terminal, otherwise it will run on your production database.
Caution: Running migrations is always sensitive part of deployments. You should always back up your data before doing such a thing.